
A Camper Inverter is the quiet link between a recreational vehicle’s battery bank and its household-style appliances. It converts stored direct current (DC) into alternating current (AC), allowing devices such as laptops, televisions, chargers, and small kitchen appliances to operate away from a campsite hookup. The U.S. Department of Energy explains that inverters perform this essential DC-to-AC conversion, although real camper systems require more than a simple box and two cables.
Demand for mobile power continues to shape this equipment. The RV Industry Association’s 2023 survey reported approximately 11.2 million U.S. RV-owning households. Its 2023 industry data also recorded 313,174 wholesale RV shipments, showing the scale of the recreational vehicle market. These figures do not prove that every owner needs a large inverter. They do show why efficient, reliable power management matters inside modern campers.
A practical installation usually includes a battery bank, fuses, appropriately sized cables, and sometimes a transfer switch. A technician checks battery voltage, continuous wattage, surge wattage, ventilation, and grounding before connecting sensitive equipment. A pure sine wave model generally provides cleaner power for computers, medical electronics, and induction devices. Still, inverter labels can confuse buyers. Marketing claims may emphasize peak output instead of sustainable capacity. That difference matters.
Small details matter.
A refrigerator starting at night can demand more power than expected. Poor cable sizing can create heat and voltage loss. This guide explains what a Camper Inverter does, how its internal switching process works, and where common design assumptions fail. The goal is useful understanding, not unrealistic promises.
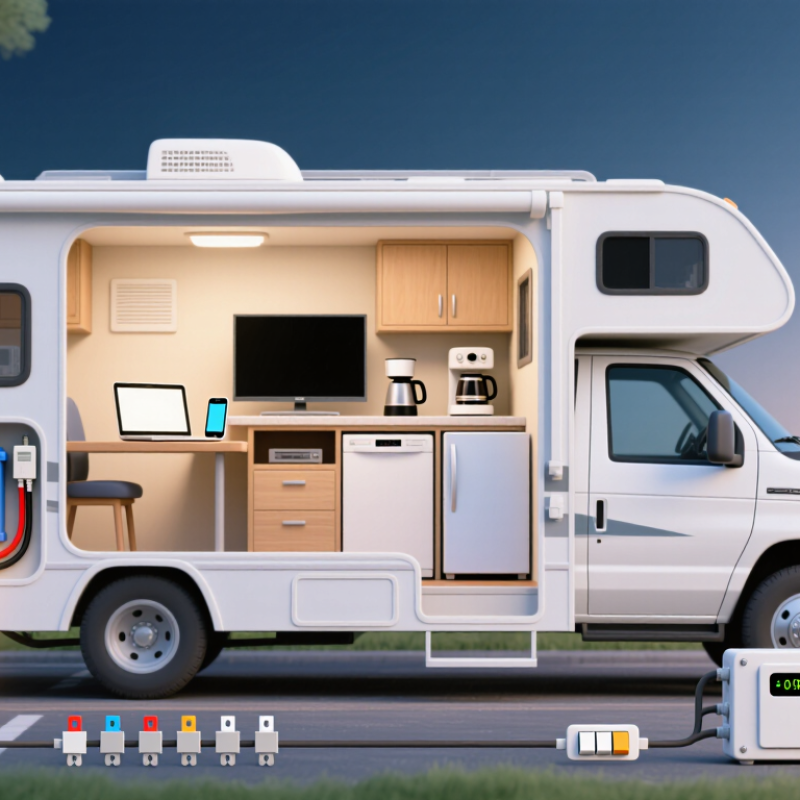
A camper inverter is an electronic device that converts 12-volt direct current from a battery into alternating current for household appliances. It allows you to use devices such as chargers, televisions, or small kitchen equipment away from a mains connection. The inverter does not create electricity. It changes its form. A battery still supplies all the energy.
Most inverters connect to the battery through thick cables and a properly sized fuse. Inside, electronic switches change the battery’s steady current into rapid pulses. A transformer adjusts the voltage, while filters shape the output into usable AC power. Some models produce a pure sine wave, which closely matches household electricity. Others create a modified waveform. Sensitive equipment may run poorly with the second type. I once assumed wattage was the only important detail. That was not obvious. Cable length, battery voltage, and heat can also affect performance.
An inverter has a continuous power rating and a short-term surge rating. The surge rating helps start motors in refrigerators, pumps, or fans. A 1,000-watt inverter cannot safely support every appliance below 1,000 watts. Starting demands may be much higher. Check each appliance’s label and the inverter’s technical manual. Ventilation is essential because heavy loads generate heat. Heat matters. A fuse should sit close to the battery, and connections must remain tight and dry. Poor installation can cause voltage drops, damaged equipment, or excessive battery drain. Even an efficient inverter consumes some power while waiting. Turning it off when unused is easy to overlook.
A camper inverter changes battery power from direct current (DC) into household-style alternating current (AC). A 12-volt battery supplies DC, while most wall sockets expect 120-volt AC. The inverter uses electronic switching circuits, transformers, and filters to create that output. Pure sine-wave models produce cleaner electricity for sensitive devices, such as laptops, medical equipment, and induction chargers. The process is not lossless. Heat is produced.
Power demand matters more than many campers expect. A 1,000-watt appliance can draw about 89 amps from a 12-volt battery at 90% efficiency. That current can empty a modest battery quickly. The U.S. Energy Information Administration reported average household electricity use near 899 kilowatt-hours monthly in 2022, but a camper should never be sized like a house. Its inverter usually serves selected circuits, not every appliance.
The inverter may supply power from the battery, shore connection, or solar-charged storage. An inverter-charger can also reverse the process, converting shore AC into regulated DC for battery charging. A transfer switch helps move safely between external power and inverter output. The RV Industry Association reported 11.2 million U.S. RV-owning households in 2024, showing why practical power design matters. Still, published ratings can mislead. Startup surges from refrigerators, pumps, and compressors may exceed their running watts. Measure real loads with a plug-in meter, check cable temperature, and leave capacity unused. Small details matter.
A camper inverter changes battery power into household-style alternating current. It lets you run selected appliances away from a campsite hookup. The main types differ in waveform, efficiency, and appliance compatibility.
A modified sine wave inverter is usually compact and affordable. It can power basic chargers, lights, and simple heating devices. However, some fans may buzz, while sensitive electronics may run hotter. A pure sine wave inverter produces smoother power, closer to utility electricity. It suits laptops, medical equipment, induction cookers, and appliances with motors. It usually costs more. Still, the cleaner output can reduce noise and operating problems.
An inverter-charger combines an inverter with a battery charger and transfer switch. It can charge the battery from shore power, then supply AC power when that connection disappears. This design saves installation space and manages power changes automatically. A separate inverter offers more flexibility, especially in smaller electrical systems. Check continuous wattage, starting wattage, battery voltage, and cable size before choosing either type. A refrigerator may need a strong startup surge, even when its running wattage looks modest.
My early assumption was that a higher wattage rating solved everything. It did not. Undersized cables, poor ventilation, and a weak battery can still cause shutdowns. Install the inverter near the battery, protect the wiring properly, and leave airflow around its cooling vents. Also, avoid running every appliance at once.
A camper inverter converts 12 V or 24 V battery power into household-style AC electricity. The chart shows representative efficiency values for the main camper inverter types; actual performance varies with load, battery voltage, temperature, and design.
Modified-sine-wave inverters are generally economical and suitable for basic resistive loads such as heaters and simple chargers. Pure-sine-wave inverters produce cleaner AC power for sensitive electronics, motors, refrigerators, and audio equipment. Inverter-chargers combine inversion with battery charging and automatic transfer functions, making them useful for integrated camper electrical systems.
A camper inverter converts 12-volt battery power into household-style alternating current. It lets you operate selected appliances when campsite electricity is unavailable. Inside, the main components include switching circuits, a transformer, control boards, cooling fans, and output sockets. A DC fuse or breaker protects the battery cables from dangerous overcurrent. Thick cables also matter because undersized wires can become hot during heavy use.
Some inverters provide a clean sine-wave output for sensitive electronics. Others produce a rougher waveform, which may affect chargers, motors, or audio equipment. Check the continuous power rating, not only the short peak rating. A refrigerator may start with a brief surge. Watch the heat. Poor ventilation can trigger thermal shutdown or shorten component life.
Safety features should include low-voltage shutdown, overload protection, short-circuit protection, and temperature monitoring. Ground-fault protection may be available where fitted, but it does not replace correct wiring or shore-power safety devices. I inspect cable lugs for looseness, keep the inverter dry, and leave clear space around its vents. Never install it beside fuel containers or battery gases. A common mistake is trusting a familiar-looking control panel. Protection layouts vary between models. The manual and measured cable length deserve more attention than guesswork. Even careful installations can need review after a larger appliance is added.
| Component or Data Dimension | What It Does | Typical Camper-Inverter Information | Safety or Operating Considerations |
|---|---|---|---|
| DC Input | Receives direct current from the camper battery bank or another DC source. | Most camper systems use a nominal 12-volt battery bank. Larger inverter systems may use 24 or 48 volts to reduce current at higher power levels. | Correct polarity, suitable cable size, and proper fusing are essential. Reversed polarity can damage the inverter. |
| Power Conversion Circuit | Uses electronic switching circuits to change low-voltage DC into high-frequency AC. | Power transistors rapidly switch the DC supply before transformers and filtering circuits produce the required AC waveform. | The enclosure should remain ventilated because switching components generate heat during operation. |
| Transformer and Voltage Regulation | Raises or adjusts the converted voltage to the required AC output level. | In North American campers, the output is commonly around 120 volts AC at 60 hertz. Other regions commonly use approximately 230 volts AC at 50 hertz. | The output voltage and frequency must match the appliances being connected. |
| Output Filter | Smooths the switched electrical signal into a usable AC waveform. | A pure-sine-wave inverter produces an output similar to utility power. A modified-sine-wave inverter produces a stepped waveform. | Pure sine wave output is generally preferred for sensitive electronics, induction motors, medical equipment, and appliances with electronic controls. |
| Pure Sine Wave Output | Supplies clean and stable AC power to a wide range of loads. | Usually offers better compatibility, quieter motor operation, and lower electrical stress than stepped-wave output. | It does not eliminate the need for grounding, overcurrent protection, or correct appliance ratings. |
| Continuous Power Rating | Defines the amount of power the inverter can deliver continuously under specified conditions. | The rating is expressed in watts. The connected load should remain within the inverter's continuous rating. | Operating continuously near the maximum rating can increase heat and shorten service life. |
| Surge or Peak Rating | Provides short-term extra power for appliances that draw more current when starting. | Compressors, pumps, refrigerators, and some power tools may require several times their running power during startup. | The surge duration and maximum peak rating must be sufficient for the appliance; otherwise the inverter may shut down. |
| Battery Current Demand | Determines how much current the inverter draws from the battery while supplying AC power. | At 12 volts, a 1,200-watt AC load can require roughly 110 amps from the battery after allowing for conversion losses. | High current requires short, heavy-gauge cables, secure connections, and a correctly sized DC fuse or circuit breaker. |
| Efficiency | Indicates how much DC input energy is converted into usable AC output. | Many modern inverters operate at approximately 85–95% efficiency under suitable load conditions, although efficiency varies by model and load level. | The energy not converted to AC becomes heat, so airflow and clearances must be maintained. |
| Idle or No-Load Consumption | Represents the power used when the inverter is switched on but supplying little or no AC load. | Even without a connected appliance, the inverter may draw power to operate its control electronics and monitoring circuits. | Turn the inverter off when it is not needed, or use an approved standby mode to reduce unnecessary battery discharge. |
| Low-Voltage Cutoff | Disconnects the AC output when the battery voltage falls below a safe operating threshold. | The cutoff helps prevent excessive battery discharge. The exact threshold depends on the inverter design and battery chemistry. | Repeated low-voltage shutdowns may indicate an undersized battery bank, voltage drop, weak connections, or insufficient charging. |
| Overload Protection | Stops or limits output when connected equipment demands more power than the inverter can provide. | The inverter may sound an alarm, reduce output, or shut down until the excessive load is removed. | Disconnect some appliances before resetting the inverter. Do not repeatedly operate it above its rated capacity. |
| Short-Circuit Protection | Protects the inverter when the AC output or connected appliance develops a short circuit. | Electronic protection or an internal protective device can interrupt the output during a fault. | A tripped protection system should be investigated rather than repeatedly reset without locating the fault. |
| Over-Temperature Protection | Monitors internal temperature and reduces or disconnects output if excessive heat is detected. | High ambient temperature, heavy loads, blocked vents, and poor airflow can all increase operating temperature. | Install the inverter in a dry, clean, ventilated location away from combustible materials. |
| Cooling System | Removes heat from power components and maintains acceptable operating temperatures. | Depending on the design, cooling may use natural convection, heat sinks, or thermostatically controlled fans. | Keep ventilation openings unobstructed and regularly remove dust from the surrounding area. |
| Grounding and Bonding | Provides a controlled path for fault current and helps reduce the risk of electric shock. | The inverter chassis and AC system should be installed according to applicable electrical codes and the camper's wiring design. | Never rely on the battery negative cable alone as a substitute for correct AC grounding and bonding. |
| Residual-Current or GFCI Protection | Helps disconnect power when leakage current is detected between an energized conductor and ground. | Protection may be provided by a GFCI or residual-current device in the camper's AC distribution system, depending on local requirements. | Test the protective device regularly and stop using the circuit if it trips repeatedly. |
| Transfer Switching | Selects between inverter power, shore power, and sometimes generator power. | An approved transfer switch can prevent two AC sources from being connected to the same circuit at the same time. | Never connect an inverter output to an energized external source unless the system is specifically designed and protected for that purpose. |
| Remote Control and Monitoring | Allows the user to turn the inverter on or off and view voltage, load, alarms, or operating status. | Monitoring functions may display battery voltage, AC output power, fault conditions, and temperature warnings. | A remote switch does not necessarily disconnect the inverter from the battery; the DC disconnect may still be required for servicing. |
| Installation Location | Determines how effectively the inverter can be cooled and protected from environmental hazards. | A suitable location is dry, well ventilated, accessible for inspection, and close enough to the battery to limit DC cable length. | Avoid fuel vapors, battery-gas accumulation, water exposure, excessive heat, and locations where loose objects can block airflow. |
Choosing a camper inverter starts with your appliances, not its advertised wattage.
List each device and record its running and startup demands. A compressor fridge, microwave, or water pump may briefly draw far more power than expected. Check both ratings. A pure sine-wave inverter is often suitable for sensitive electronics and reduces electrical noise.
Do not guess.
Match the inverter to your camper’s battery voltage and usable capacity. A 1,000-watt load can draw roughly 90 amps from a 12-volt battery after efficiency losses. That requires short, thick battery cables, secure terminals, and a correctly rated fuse near the battery.
Install the inverter in a dry, ventilated area with space around its cooling vents. Avoid placing it inside a sealed battery compartment.
Follow the installation manual and applicable electrical standards.
Plan the AC wiring carefully. A fixed connection should include proper grounding, circuit protection, and a suitable transfer arrangement when external power is available. Never improvise with loose connections.
Test the system gradually, checking cable temperature, voltage drop, and inverter fault indicators. Start with one small appliance. Then add heavier loads.
A useful lesson is that neat wiring can still hide a poor connection.
Recheck every terminal after the first trip, because vibration may loosen hardware.
If the installation involves household-style wiring, ask a qualified electrician to inspect it.